Part 2: Installing the VTEX Headless CMS plugin in your FastStore project
This tutorial is intended for those who started their FastStore project with the Store Components starter. If you started your project with the Base Store starter, please refer to this tutorial.
Introduction
As a developer, besides creating custom frontend components for your client's store, you will also create the schemas that make the content of these components editable via the CMS. Notice that you are the one responsible for giving business users the autonomy and flexibility to manage the frontend content of your choice.
So back to our FastStore project, in this part of this tutorial, we'll set up our environment to later define our Sections and Content Types.
Installing the CMS plugin
To integrate your FastStore project with VTEX Headless CMS data layer, we'll need to install the @vtex/gatsby-plugin-cms plugin.
- Open the terminal and change to the source directory of your FastStore project.
- Install the VTEX Headless CMS plugin.
yarn add @vtex/gatsby-plugin-cms
- Now, in the root directory of your project, open the
gatsby-config.jsfile and add the following configurations for@vtex/gatsby-plugin-cms.
module.exports = {
  ...,
  plugins: [
    ...,
+    {
+      resolve: '@vtex/gatsby-plugin-cms',
+      options: {
+        tenant: '{accountName}',
+        workspace: '{workspace}',
+        environment: '{environment}'
+      },
+    },
  ],
}
Remember to replace the values between curly brackets according to your scenario.
Configuring the CMS plugin
Now let's configure the CMS plugin to define which components of our project will be available at the VTEX Headless CMS.
- Create an
index.tsfile insidesrc/@vtex/gatsby-plugin-cms/.
src/
├── @vtex
│   ├── gatsby-plugin-cms
│   │   └── index.ts
- Copy and paste the following code in the
src/@vtex/gatsby-plugin-cms/index.tsfile.
import type { BuilderConfig } from '@vtex/gatsby-plugin-cms'

export const builderConfig: BuilderConfig = {
  blocks: {
    // your sections
  },
  contentTypes: {
    // your content types
    home: {
      name: 'Home Page',
      extraBlocks: {},
    },
  },
  messages: {
    // your translation keys
  },
}
- Save your changes.
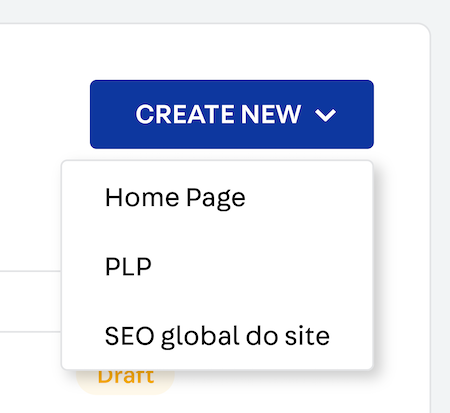
Now if you open the VTEX Headless CMS app in the VTEX Admin and click on Create New, you'll see the option to create a page of the Home Page type.
Understanding the gatsby-plugin-cms/index.ts file
In this section, let's find out what the gatsby-plugin-cms/index.ts file does. Notice that we use this file to export the BuilderConfig object, which, in turn, exports the following properties:
blocks- a Javascript object that describes the schema of a frontend component. A schema defines the structure of a section of the VTEX Headless CMS. Take the following example of the Dynamic Shelf component.
- Code
- CMS
const DynamicShelf: Schema = {
  title: 'Dynamic Shelf',
  description: 'Change your dynamic shelf',
  type: 'object',
  properties: {
    title: {
      type: 'string',
      title: 'Shelf Title',
    },
    searchParams: {
      type: 'object',
      title: 'Search parameters for Shelf',
      properties: {
        from: {
          type: 'number',
          title: 'from',
        },
        to: {
          type: 'number',
          title: 'to',
        },
        collection: {
          type: 'string',
          title: 'Collection',
        },
        hideUnavailableItems: {
          default: true,
          type: 'boolean',
          title: 'Hide unavailable items',
        },
        orderBy,
      },
    },
  },
}

contentTypes- a Javascript object that describes the types of pages available for customization at the VTEX Headless CMS.
- Code
- CMS
export const contentTypes: ContentTypes = {
  home: {
    name: 'Home Page',
    extraBlocks: {},
  },
  ...PLP({}),
  seo: {
    name: 'SEO global do site',
    extraBlocks: {
      SEO: {
        siteMetadata,
        facebook,
      },
    },
  },
}
messages- an object that defines translation keys.
  messages: {
    'admin/socialmediaTitle': 'Social Media',
    'admin/meta/socialmediaTitleFieldTitle': 'Title',
    'admin/meta/socialmediaTitleFieldDescription':
      'Appears when a link to this page is shared on social media',
    'admin/meta/socialmediaDescriptionFieldTitle': 'Description',
    'admin/meta/socialmediaDescriptionFieldDescription':
      'Appears when a link to this page is shared on social media',
    'admin/meta/socialmediaImageFieldTitle': 'Thumbnail',
    'admin/meta/socialmediaImageFieldDescription':
      'Appears when the page is shared on social media',
  },
Now that you have created your src/@vtex/gatsby-plugin-cms/index.ts file and have an overall understanding of how you'll use it, let's define our schemas, content types and messages.